上一章粗略地对 Micronaut 了解之后,我们现在开始上手写写代码吧。
Micronaut开发环境搭建
1. 环境要求
最新版本要求JDK 17或更高版本
构建工具:Gradle或Maven
可选:Micronaut CLI(方便项目生成)
2. 创建项目
有几种方式可以创建Micronaut项目:
使用Micronaut Launch(在线向导):
访问 https://micronaut.io/launch ,选择应用类型和特性,生成项目并下载或使用CLI工具命令行参数生成项目。
使用CLI工具:
使用 sdkman 安装Micronaut CLI后运行:
  mn create-app --build=gradle --jdk=17 --lang=java --test=junit com.example.demo
  # 或
mn create-app --build=maven --jdk=17 --lang=java --test=junit com.example.demo使用curl直接调用API:
curl --location --request GET 'https://launch.micronaut.io/create/default/com.example.demo?lang=JAVA&build=MAVEN&test=JUNIT&javaVersion=JDK_17' --output demo.zip3. IDE支持
主流IDE都对Micronaut提供了良好支持:
IntelliJ IDEA Ultimate:提供项目向导、配置自动完成、Micronaut数据支持等
VS Code:通过GraalVM扩展包支持Micronaut开发
Eclipse:需要显式启用注解处理(APT)支持
构建Micronaut应用实践
1. 项目结构
新创建的Micronaut项目遵循标准Maven/Gradle项目结构:
  src/
    main/
      java/       # Java源代码
      resources/  # 资源文件
        application.yml  # 主配置文件
        logback.xml     # 日志配置
    test/
      java/       # 测试代码
主应用类位于src/main/java中,通常如下(一股SpringBoot风~_~):
  package com.cxl;

  import io.micronaut.runtime.Micronaut;

  public class Application {
      public static void main(String[] args) {
          Micronaut.run(Application.class, args);
      }
  }
2. 开发REST API
Micronaut支持多种服务器端工作负载,包括REST、gRPC、GraphQL等。以下是开发REST API的关键步骤:
创建控制器:
  package com.cxl.controller;

  import io.micronaut.http.MediaType;
  import io.micronaut.http.annotation.Controller;
  import io.micronaut.http.annotation.Get;

  @Controller("/hello")
  public class HelloController {
      @Get(uri="/{name}", produces=MediaType.TEXT_PLAIN)
      String hello(String name) {
          return "Hello " + name;
      }
}这个控制器处理对/hello/{name}的GET请求,返回纯文本响应。启动应用后,可以通过curl或直接浏览器测试:
curl http://localhost:8080/hello/cxl
返回JSON响应:
  package com.cxl.controller;

  import io.micronaut.http.MediaType;
  import io.micronaut.http.annotation.Controller;
  import io.micronaut.http.annotation.Get;
  import java.util.HashMap;
  import java.util.Map;

  @Controller("/simple")
  public class SimpleController {
      @Get(produces = MediaType.APPLICATION_JSON)
      public Map<String, String> index() {
          Map<String, String> msg = new HashMap<>();
          msg.put("message", "A simple message");
          return msg;
      }
  }
3. 添加服务层
Micronaut支持分层架构,我们可以添加服务层:
  // 接口定义
  package com.cxl.service;

  public interface IGreetingService {
      String getGreeting();
  }

  // 实现类
  package com.cxl.service.impl;

  import com.cxl.service.IGreetingService;
  import jakarta.inject.Singleton;

  @Singleton
  public class DefaultGreetingService implements IGreetingService {
      @Override
      public String getGreeting() {
          return "hello, ";
      }
  }
然后在控制器中注入服务:
  @Controller("/greet")
  public class GreetingController {
      private final IGreetingService greetingService;

      @Inject
      public GreetingController(IGreetingService greetingService) {
          this.greetingService = greetingService;
      }

      @Get("/{name}")
      public String greet(String name) {
          return greetingService.getGreeting() + name;
      }
  }
4. 声明式HTTP客户端
Micronaut提供了声明式HTTP客户端,用过 forest 的肯定不陌生,只需添加依赖后定义接口即可:
  <dependency>
    <groupId>io.micronaut</groupId>
    <artifactId>micronaut-http-client-core</artifactId>
  </dependency>
package com.cxl.service;
import io.micronaut.http.annotation.Get;
import io.micronaut.http.client.annotation.Client;
@Client("/greet")
public interface GreetingClient {
@Get("/{name}")
String greet(String name);
}使用客户端:
  @Inject
  GreetingClient client;

  String greeting = client.greet("Micronaut");
5. 测试
Micronaut强调可测试性,提供了专门的测试注解@MicronautTest:
  package com.cxl;

  import io.micronaut.http.client.annotation.Client;
  import io.micronaut.test.extensions.junit5.annotation.MicronautTest;
  import jakarta.inject.Inject;
  import org.junit.jupiter.api.Test;
  import io.micronaut.http.client.HttpClient;

  @MicronautTest
  public class HelloControllerTest {
      @Inject
      @Client("/")
      HttpClient client;

      @Test
      void testHello() {
          String response = client.toBlocking().retrieve("/hello/chenxianlin");
          assert response.equals("Hello chenxianlin");
      }
  }
数据库访问
Micronaut支持多种数据访问方式,包括JPA、Hibernate、MongoDB等。以下是使用JPA的示例:
添加依赖(Maven):
  <dependency>
      <groupId>io.micronaut.data</groupId>
      <artifactId>micronaut-data-hibernate-jpa</artifactId>
  </dependency>
  <dependency>
      <groupId>io.micronaut.data</groupId>
      <artifactId>micronaut-data-processor</artifactId>
      <scope>provided</scope>
  </dependency>
  <dependency>
      <groupId>com.mysql</groupId>
      <artifactId>mysql-connector-j</artifactId>
  </dependency>
  <dependency>
      <groupId>io.micronaut.sql</groupId>
      <artifactId>micronaut-jdbc-hikari</artifactId>
      <scope>compile</scope>
</dependency>配置数据源(application.yml):
  datasources:
    default:
      driver-class-name: com.mysql.cj.jdbc.Driver
      db-type: mysql
      dialect: MYSQL
      url: jdbc:mysql://localhost:3366/demo?serverTimezone=UTC&useSSL=false&allowPublicKeyRetrieval=true
      username: root
      password: root
  jpa:
    default:
      properties:
        hibernate:
          hbm2ddl:
auto: update定义实体:
  @Serdeable  // 序列化,很重要
  @Entity
  @Table(name = "person")
  public class Person {

      @Id
      @GeneratedValue(strategy = GenerationType.IDENTITY)
      private Long id;
      private String name;
      private String birth;
      private String status;
      // 省略getter/setter
}创建Repository:
  @Repository
public interface PersonRepository extends JpaRepository<Person,Long> {}在服务中使用:
  public interface IPersonService  {
      List<Person> findAll();
      Person findById(Long id);
      Person save(Person person);
  }

  @Singleton
  public class PersonService implements IPersonService {

    @Inject
    private PersonRepository personRepository;

    @Override
    public List<Person> findAll() {
        return personRepository.findAll();
    }

    @Override
    public Person findById(Long id) {
        return personRepository.findById(id).orElse(null);
    }

    @Override
    public Person save(Person person) {
        return personRepository.save(person);
    }
}定义接口:
@Controller("/person")
public class PersonController {
@Inject
IPersonService personService;
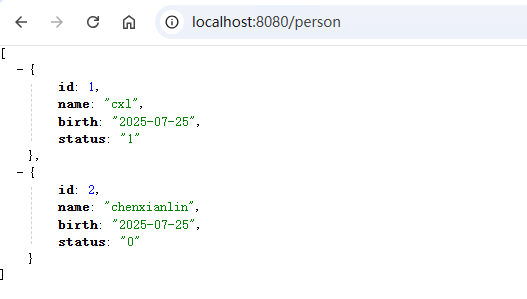
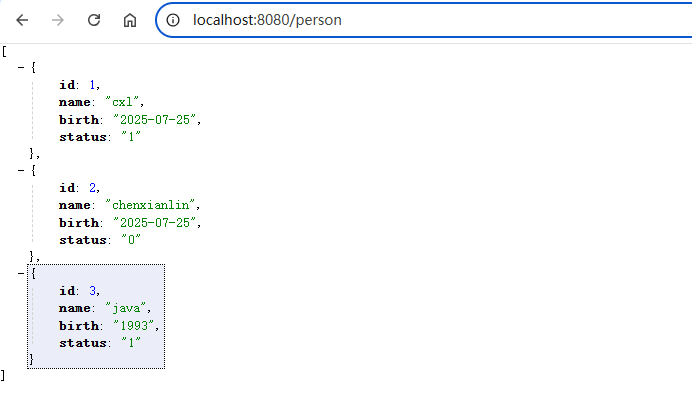
@Get
public List<Person> getPerson() {
return personService.findAll();
}
@Get("/{id}")
public Person getPersonById(Long id) {
return personService.findById(id);
}
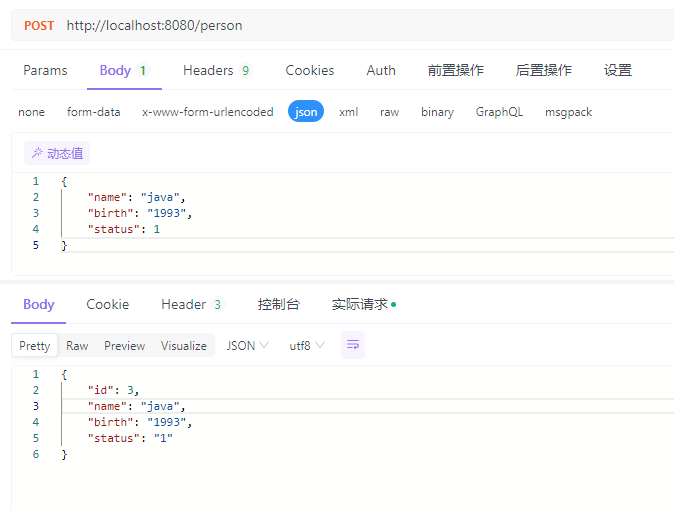
@Consumes("application/json")
@Post
public Person savePerson(@Body Person person) {
return personService.save(person);
}
}
Micronaut最佳实践
基于实际项目经验,以下是使用Micronaut的最佳实践建议:
合理使用作用域:
默认使用
@Prototype作用域(每次注入新实例)对于无状态服务,使用
@Singleton减少对象创建开销
响应式编程选择:
新项目推荐使用Reactor(Mono/Flux)
已有RxJava项目可继续使用Observable/Single
配置管理:
环境相关配置使用
application-{env}.yml敏感信息通过环境变量或Vault注入
测试策略:
充分利用
@MicronautTest加速测试对于简单组件测试,可使用普通单元测试避免启动上下文
GraalVM原生镜像:
从项目开始就考虑原生兼容性
使用
@ReflectiveAccess等注解谨慎处理反射需求逐步测试和调整原生镜像配置
微服务设计:
每个服务保持小而专注
使用Micronaut的
@Client实现类型安全的服务调用实现适当的弹性模式(重试、断路器)